
Sync Your Service Email in GloveBoxCRM
-
Open Agency Settings
-
Click your name in the top‑right corner of GloveBoxCRM.
-
Select Edit Agency.
-
-
Navigate to Customizations
-
In the navigation, click Customizations.
-
-
Enter & Sync Service Email
-
Locate the Service Email field.

-
Type your dedicated service email address (Gmail or Outlook).
-
Click Sync Service Email.
-
-
Authenticate
- Outlook
- Follow the on-screen instructions to grant GloveBoxCRM permission to sync your service email.
-
Gmail
-
Note the special instructions when syncing with a Gmail email
-
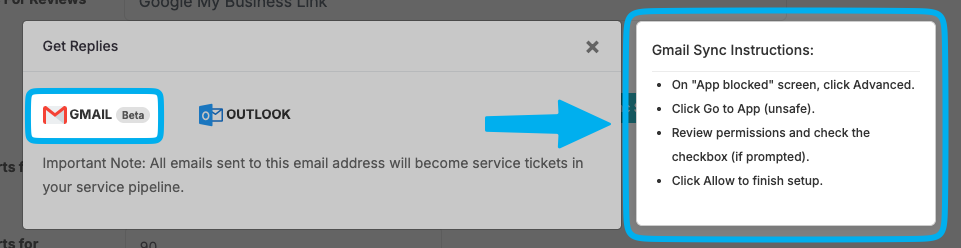
- Click "Advanced"
- Click "Go to App"
- Follow the on-screen instructions to grant GloveBoxCRM permission to sync your service email.
-
- Outlook
-
Confirm Sync
-
Once synced, the button will change to Disconnect Email, indicating success.
-
Service requests will be automatically created from emails
Now, any time an email is sent to your service email, it will automatically be converted to a service request and the body of the email will be put as the description of the service request.
Need Help?
If you run into any issues or have questions:
-
Use the in‑app chat in GloveBoxCRM
-
Email our Support team at support@gloveboxapp.com