
Setting Up Your Initial GloveBox Report
Below are the instructions to create your Client List report, which is what GloveBox uses to pull in data from the Applied - TAM AMS.
Step 1: Navigate to the Report
Log in to Applied TAM. Navigate to the 'Reports' tab.
- Within the 'Reports' Module, select the 'Search' button.
- Select the 'Report Type' as 'Search - Customers.'
- Within the 'Search - Customers' option, ' select 'Policies - Current.'
- Select the 'Search' Button, then "Search - Customers" from the Report Type section proceeded by "Policies - Current" from the Report Choices section.

Step 2: Customize the Report
Within the Report Criteria, ensure the at all Criteria are set to 'All,' as shown in the image below.
- Verify that the Expiration Dates are set as follows.
- -2 months days in the past
- +14 months into the future
- Ensure the 'Record Listings' field is set to 'List Each Time Found.'

Once you've verified the Criteria are correct, select the 'Fields/Sort' tab. Once you're inside of the 'Data File Choices' dropdown menu, ensure the following.
- Within the bottom dropdown marked 'Field Options,' change this to 'Lookup Field Name.'
- If this field does not appear, check the 'Summary Output' box in the top right.

- Then, select or highlight each of the following options. All options must be selected.
- Agency
- Branch
- Department
- Policy Type
- Billing Company
- Issuing Company
- Master Company
- Billing Mode
- Producer One
- Producer Two
- Producer Three
- Policy Status
- Once all options are selected, then proceed to click the 'select' option with the Green Arrow. That will move those options forward into the 'Fields Selected' window.
- Then, save this view by selecting 'Save.'
Next, set your 'Field Options.'
- Navigate to 'Field Value.' From the 'Data File' Choices, select 'Policy Data.' Choose the option to 'Select All.'
- From the Data File Choices, select 'Customer Data' and choose the option to 'Select All.'
- .From the Data File Choices, select 'Additional Customer Data' and choose the option to 'Select All.'

- Then, save this view by selecting 'Save.'
Step 3: Save and Run the Report
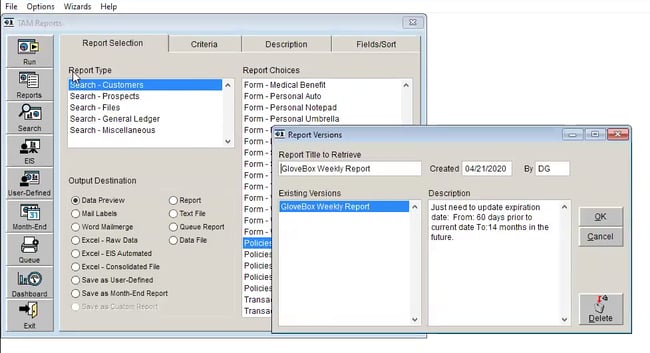
After verifying that you've marked all necessary fields, select the option to 'Save Criteria.'
- Name your report [GloveBox agency ID]-[AGENCY_NAME] GloveBox Client List
- Copy and paste the following text into the report's 'Description' field.
- Update Expiration date. From: -60 days prior to the current date. To: 14 months in the future of today's date.
- Copy and paste the following text into the report's 'Description' field.
Once your report is saved, you're ready to run the report.
- On the left hand side of the screen, select 'Run.'
- Mark the 'Output Destination' to 'Data File - Comma Delimited.'
- Select 'OK.' This will run and open the report.
- Save the updated file to your computer. Be sure it is named [GloveBox agency ID]-[AGENCY_NAME] GloveBox Client List
Policy Number Format
If you open the exported Excel spreadsheet, the policy numbers may convert to scientific notation. Please follow the instructions on this page prior to sending the report to the GloveBox team.
Step 4: Send the Report to GloveBox
- Select an appropriate location on your device to save the exported CSV file.
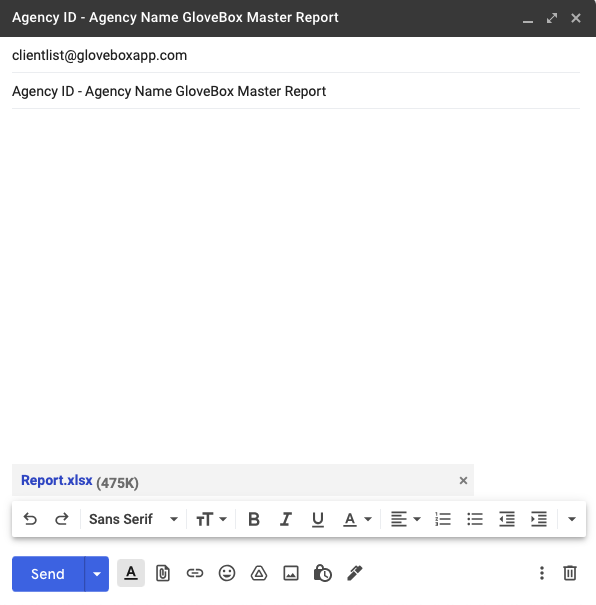
- Open your email and create a new message. Attach the exported report.
- Send the email to clientlist@gloveboxapp.com.
- Use the subject line: [Agency_ID] - [Agency_Name] GloveBox Master Report.
- Click 'Send.'
Consistency is important when sending your client list reports manually. Emails sent to GloveBox should always have the same subject line and should be sent from the same email address.
If you change the subject line or sender address, please let GloveBox know so that we can effectively import your list in a timely fashion.
Sending Your Report to GloveBox Each Week
Once you create your initial report and send the report to GloveBox, it's important to schedule a date/time to send the report to GloveBox on a weekly basis.
- Add a task or calendar hold for yourself as a reminder to send the list.
Below are the instructions to access the report and send it to the GloveBox team.
Step 1: Generate the Report
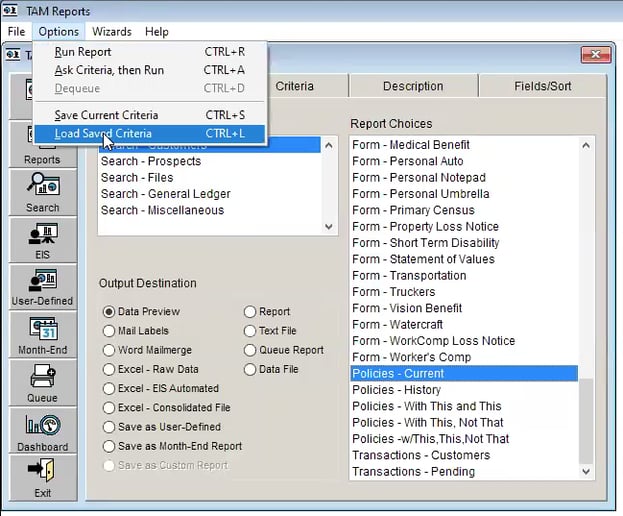
Log in to Applied - TAM. Navigate to the 'Reports' tab.
- Within 'Reports,' access the 'Report Selection' tab.
- Choose 'Search - Customers' from the 'Report Type' Dropdown.
- Within the 'Report Choices' Dropdown, select 'Policies - Current.'
- Under the 'Output Destination' menu, select 'Data File' > 'Comma Delimited.'

- Ensure that the 'Expiration Date' goes back 60 days prior, and looks out 14 months into the future.

- Once you've verified your details, select 'Run' on the left-hand side to run the report.
- Ensure the output destination is marked as 'Data File' > 'Comma Delimited.'

Choose the option to 'Send Output to a New File Name.'
- Use the following format: [Agency_ID] - [Agency_Name] GloveBox Master Report.
Step 3: Send the Report to GloveBox
- Select an appropriate location on your device to save the exported CSV file.
- Open your email and create a new message. Attach the exported report.
- Send the email to clientlist@gloveboxapp.com.
- Use the subject line: [Agency_ID] - [Agency_Name] GloveBox Master Report.
- Click 'Send.'
Consistency is important when sending your client list reports manually. Emails sent to GloveBox should always have the same subject line and should be sent from the same email address.
If you change the subject line or sender address, please let GloveBox know so that we can effectively import your list in a timely fashion.
By following these steps, you can ensure that your GloveBox reports are generated and sent correctly. If you have any questions or encounter any issues, please reach out to your Customer Success point of contact for assistance.
Policy Number Format
If you open the exported Excel spreadsheet, the policy numbers may convert to scientific notation. Please follow the instructions on this page prior to sending the report to the GloveBox team.