
Video Walkthrough:
Why Upload Policy Documents to GloveBox?
Sharing documents that contain personal identifiable information (PII) over email can leave you and your policyholders vulnerable to data breaches. The document upload feature offers a safer, more secure way to share policy documents with clients while also encouraging them to engage with GloveBox.
By uploading policy documents, your customers will have repeat and secure access to their files, reducing the need for them to call you for the same document later. This process also serves as an opportunity to introduce clients to GloveBox, where they can explore additional features like bill payments, claims filing, and requesting new quotes.
Examples of Documents You Can Upload:
- ID cards
- Declaration pages
- Renewals
- Policy memos
- New quotes
Now you can send and store all policy documents safely and securely with GloveBox.
Please note that only PDF file types under 50MB are currently supported. Additionally, documents cannot be transferred from a 3rd party, such as an AMS, directly into GloveBox without an integration.
If you need to add a document in your AMS to GloveBox, you must first download that document onto your computer, then upload it into GloveBoxHQ.
How to Upload a Policy Document
-
Navigate to the Clients tab in GloveBoxHQ and search for the client’s account using their name, email, or phone number.
- If the customer is unverified, send them an invitation to GloveBox by clicking the Invite button. They will receive an email to activate their account.
- Once verified, proceed with uploading their documents.
-
Locate the policy where you want to upload a document.
- If no policies exist in the client profile, click Add a Policy to create one before uploading documents.
- If the client has a carrier added but no policy details, you must first add a policy before proceeding.
-
Upload the document by navigating to the Documents tab and clicking the Upload icon.

- Alternatively, drag and drop the document into the designated upload area.
- Multiple documents can be uploaded at once and will be saved under their existing file names.
-
Edit document details as needed.

- Rename the document to clearly indicate its purpose (e.g., "New ID Card").
- Assign a document category (e.g., "ID Card") to help customers filter and find documents easily.
-
Customer receives an email notification.

- Once uploaded, the customer will receive an email notification informing them that a document is available in their GloveBox account.
- This is particularly useful during renewals or when providing requested documents, as GloveBox will automatically notify the customer.
-
To view, download, or delete a policy document:
Hover over the document. On the far right, a 3-dot menu will appear. Once selected, the options for 'View/Download' and 'Delete' will become available.

Please note that only manually uploaded policy documents can be deleted.
Troubleshooting Document Upload Issues
- If you encounter an error while uploading a PDF document, try the following:
- Instead of using your browser’s download/export PDF function, print the document and select Save as PDF before uploading.
- Instead of using your browser’s download/export PDF function, print the document and select Save as PDF before uploading.
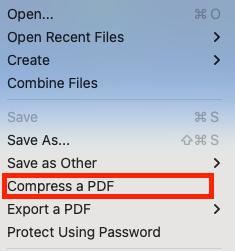
- If you experience issues uploading PDFs under 50 MB and receive an error such as the following: "Cannot read properties of undefined (reading
document)" | Screenshot attached. Please do the following: Open the document and "compress" the file.- Attached a screenshot from "Adobe Acrobat" on a Mac.
- Go to "File" on the menu bar
- Select "Compress PDF",
- Follow the steps, save and give the document a "Name"
- Go to "File" on the menu bar
- Attached a screenshot from "Adobe Acrobat" on a Mac.

By following these steps, you can ensure a smooth and secure document-sharing experience for both you and your clients.
![]()